Screening Section
This section allows you to complete electronic screening questionnaires during an encounter. You can also use this section to document scores for questionnaires that are completed offline. You can use screening questionnaires to assess risk for, or severity of, disorders or conditions such as autism and depression. These questionnaires result in a score and often include guidelines and proposed treatment actions. You can track a patient's questionnaire results over time using the Graph link in the screening questionnaires flowsheet.
You must have a user role that includes permission to edit the clinical chart. You must have the Clinicals Admin role to configure screening questionnaires.
Before you can use this section, you must configure your screening questionnaires:
- Use the Screening Questionnaires page to select the global screening questionnaires to make available at your practice.
- Use the Encounter Plans page to add the questionnaires to encounter plans. Using this page, you can link encounter reasons or follow-up reasons to one or more screening questionnaires. During an encounter, if you select an encounter reason, chief complaint, or follow-up reason that has an associated encounter plan, all of the plan's diagnoses, orders, and templates (including screening questionnaires) are added to the encounter automatically.
- Use the Order Type & Procedure Template Mapping page to map screening questionnaires to procedure codes (optional). When you complete a screening questionnaire that has been mapped to a procedure code, the procedure codes automatically appear next to the questionnaire in the Services section of the Billing tab.
- From the Intake stage of an encounter, click the Screening section in the checklist.
- Click the plus sign
 to open the section.
The Screening window appears. - Search for and select the questionnaires that you want to administer. You can select multiple questionnaires to add to the encounter. Click X next to a questionnaire to remove it.
Important: When you remove a questionnaire, any data that was entered into that questionnaire is deleted.
Your top five most frequently used questionnaires are listed alphabetically at the top of the Screening drop-down list under Most Frequently Used Screeners. The remaining screening questionnaires are listed alphabetically under Other Screeners. - Click the expand icon
 to view the questionnaire and enter responses.
 - To see more information about the questionnaire you are working on, click the Background tab.
- After all questions are answered, click Score.
The score guidelines appear at the top of the questionnaire. This information remains visible after you collapse the questionnaire. - Click Save.
For screening questionnaires that are not fully supported in athenaOne or questionnaires that a patient takes offline (for example, on paper), you can document the score in the encounter.
Note: Like questionnaires completed in athenaOne, completed score-only questionnaires appear in the patient chart and use the available graphing and billing code mapping features.
After the patient fills out the screening questionnaire, enter the score as follows.
- If you plan to link one or more documents to the score-only screening questionnaire (for example, the paper questionnaire that the patient filled out), upload the document to the patient chart and tie it to the encounter.
- Using the Add Document page, upload the questionnaire document to your computer.
For the Document Class, select Encounter Document – Health History Questionnaire. - When the document view opens, select the encounter from the Tie To Patient Encounter menu and click Save.
- From the Intake stage of the encounter, click the Screening section in the checklist.
The Screening section opens. - Click the menu at the top to see all the questionnaires your organization has copied.
- From the menu, select the score-only questionnaire by checking the box to the left of the questionnaire name.
The patient must take the questionnaire before you enter its score in the encounter.
Note: If the patient declines to answer the questions, select a reason from the menu below the questionnaire name and click the Save button (see To record that a patient declined a screening questionnaire). - Score — Enter the numeric score from the offline questionnaire.
- Notes — Enter any notes about the questionnaire.
- Documents — You can link one or more documents to a screening questionnaire (for example, you can link the paper questionnaire that the patient filled out to attach it to this score-only questionnaire).
Note: Before you can link a document to a screening questionnaire, the document must first be uploaded to the patient chart and tied to the encounter (see step 1). - In the Screening window, click Select document.
The list of documents tied to the encounter appears. - Select the questionnaire document from the list.
A link to the document appears on the screening questionnaire and on the read-only view of previously completed questionnaires. - Click the Save button. (You must click the Save button in the Screening section to save your work.)
Note: The Administered by name and time stamp do not appear for score-only questionnaires.
The Screening section of the Vitals tab shows previous screening questionnaires administered and related scores. You can click the flowsheet icon ![]() to see a table or graph of the patient's responses to the questionnaires over time.
to see a table or graph of the patient's responses to the questionnaires over time.
Note: For more information about flowsheets, see Flowsheets.
- In the patient chart, click the Vitals chart tab at the left side of the page and scroll down to the Screening section.
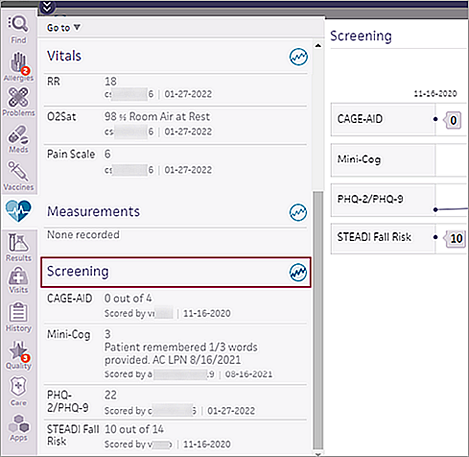
- In the Screening section, click the flowsheet icon
 .
. -
The flowsheet displays the graph view by default with individual scores indicated by dots.

-
Hover over a screening score dot to view the score and the date the screening questionnaire was scored. If a screener is score-only or competed via self check-in, this is indicated in the tooltip.
Examples:
12 (score-only) 11-28-2021
12 (self check-in) 11-28-2021 -
Click a screening score to open a read-only version of the screening questionnaire below the flowsheet.
The selected data point is indicated by a ring around the dot.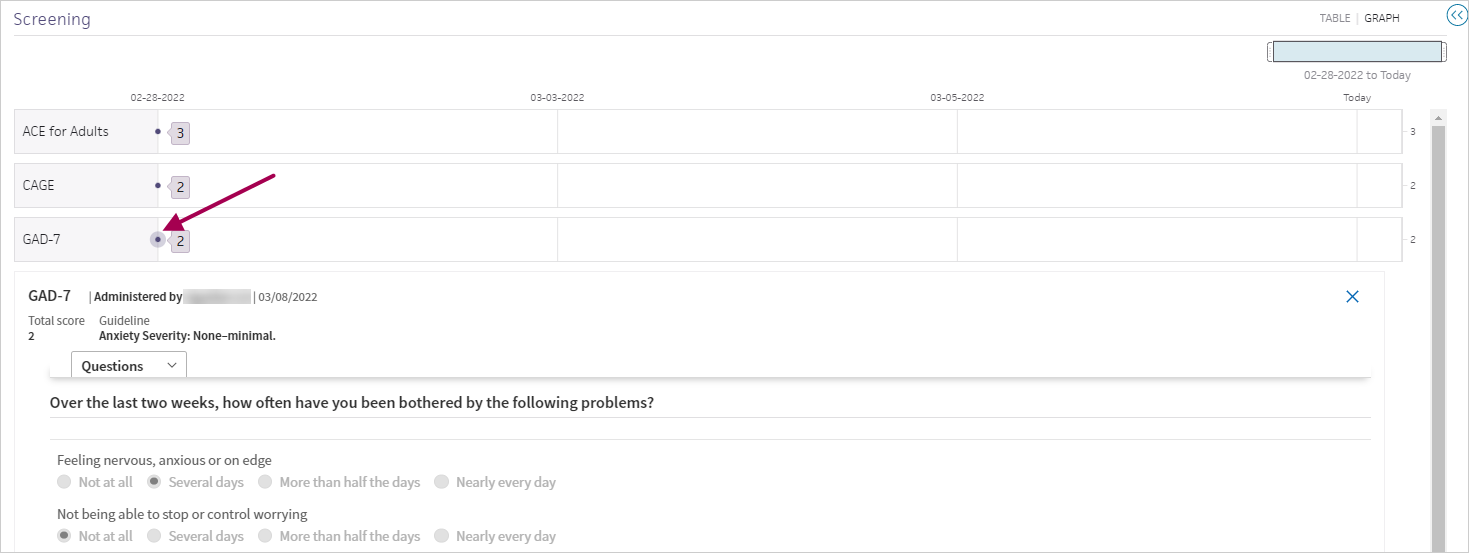
If a screener is score-only or competed via self check-in, this is indicated at the top of the read-only screener.
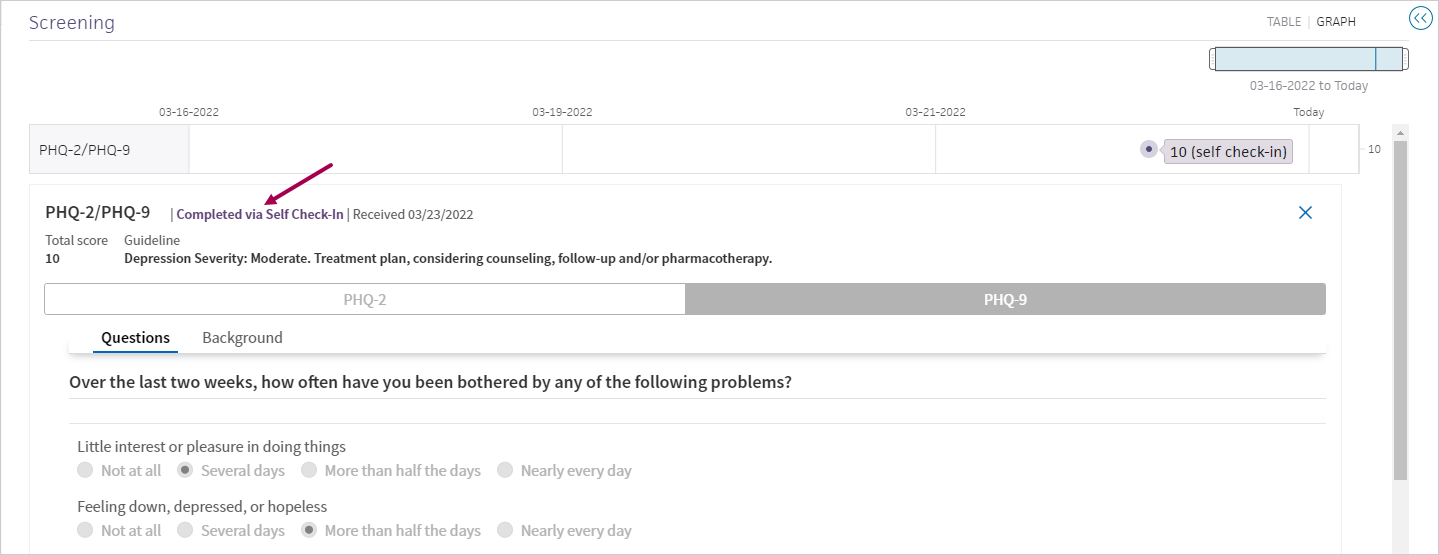
Note: The Completed via Self Check-In Received date reflects when the screening questionnaire was received, not the date of the appointment. -
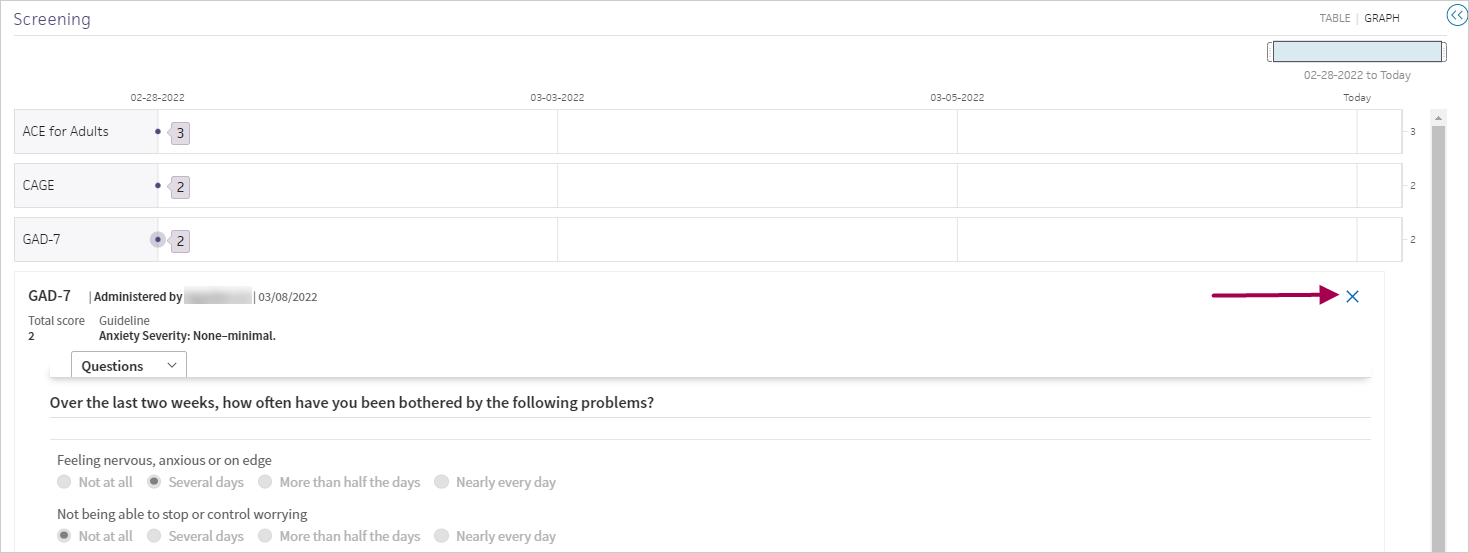
Click the X in the upper right to close the screening questionnaire.
- Click table or graph in the top right to change your view of the flowsheet.
To support clinical quality reporting requirements, you can indicate that a patient declined to complete a screening questionnaire along with the reason why. The reasons for declining a screening questionnaire support clinical quality measure (CQM) documentation and are backed by SNOMED codes.
Screening questionnaires marked as declined appear in the encounter summary and full encounter summary, the patient chart, the Patient Care Summary, the summary of care record, and in the Screening flowsheet.
- From the Intake stage of an encounter, click the Screening section in the checklist.
- Click the plus sign
 to open the section.
The Screening window appears. - Select the screening questionnaire that you want to administer.
The questionnaire appears. - If the patient declines to answer the questions, select the reason from the menu below the questionnaire name. The reason you select and save will be visible in the Screening flowsheet.
If you previously selected the Patient declined option, the Patient refused option is preselected.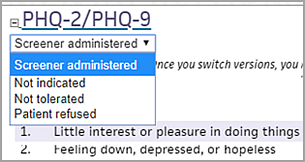
- Not indicated — Select this option when, for example, a patient returns for a follow‑up visit shortly after a previous visit when the questionnaire was completed and reviewed. This is a medical reason, which satisfies data reporting requirements.
- Not tolerated — Select this option when, for example, a patient comes in for a quick nurse visit and becomes angry or agitated when you ask the screening questions. This is a medical reason, which satisfies data reporting requirements.
- Patient refused — Select this option when, for example, a patient comes in for a quick nurse visit and declines to answer the screening questions because he's in a hurry or feels uncomfortable. This is not a medical reason, so it doesn't satisfy data reporting requirements.
- Click the Save button. (You must click the Save button in the Screening section to save your work.)
The PHQ-2/PHQ-9 questionnaire incorporates the functionality of both the two-question and nine-question versions of the Patient Health Questionnaire.
- From the Intake stage of an encounter, click the Screening section in the checklist.
- Click the plus sign
 to open the section.
The Screening window appears. - Select the PHQ-2/PHQ-9 questionnaire by clicking the box to the left of the name. By default, the PHQ‑2 questionnaire appears below.
- To immediately administer the PHQ‑9, click Administer PHQ‑9. The remaining seven questions appear.
- Select the corresponding option for the patient's response to each of the PHQ‑2 questions.
Note: If the patient declines to answer the questions, select a reason from the menu below the questionnaire name and click the Save button (see To record that a patient declined a screening questionnaire). - Click Score.
- Finding — Select Positive or Negative.
Note: Depression screening questionnaires such as the PHQ include the Finding field to satisfy data reporting requirements for clinical quality measures. For a list of the depression screening questionnaires that use the Finding field, see Documenting positive or negative results for depression screening. - If the patient's score is 3 or greater, the PHQ‑2 expands to display the full PHQ‑9, as noted in the guidelines.
- Complete the remaining questions and click Score Again. The PHQ‑9 score appears below.
- Click Graph.
If the patient previously completed PHQ‑2 and PHQ‑9 questionnaires, all the questionnaires appear in a flowsheet that you can display as a graph and as a table.
The Screening section is available in both the Intake and Exam stages.
When you complete and score a questionnaire, the proposed guidelines and treatment actions appear. You can also track a patient's questionnaire results over time using the Graph link in the screening questionnaires flowsheet.
For screening questionnaires administered in athenaOne, the username of the person who administered the questionnaire and the day and time it was completed are displayed below each completed questionnaire in the encounter and on any printed versions. (For score-only questionnaires, the username and time stamp are not displayed.) In the Screening section of the Vitals tab, the first and last name of the provider who administered the questionnaire and the date it was completed are displayed. This information is updated each time the questionnaire is modified and re-scored.
Providers enrolled in quality management programs can automatically satisfy the following measures using screening questionnaires.
Program |
Measure |
Questionnaires |
| Adult Preventive Care Guidelines | Screening for clinical depression and follow-up | PHQ‑2/PHQ‑9; Geriatric Depression Scale |
The magic word for the Screening section is {{CLINICALSECTION_SCREENING}}.
When you use this magic word, all the information shown in the expanded Screening section is displayed, including the questions, answers, score, and notes for all questionnaires administered during the encounter. The only exception is the Guideline content because this information is automatically generated and is not part of the provider's documentation.
Note: If you place this magic word inside HTML tags, it will not work.
Many screening questionnaires are self-administered, meaning that the patient completes them on paper. You can enter the score for these self-administered questionnaires in the Screening section of the encounter (see To complete a score-only questionnaire during an encounter).
You can use the Clinical Paper Forms page to create custom clinical paper forms. Be sure to classify screening questionnaires as Encounter Document - Health History Questionnaire. This classification ensures that any uploaded or faxed forms can be associated with an encounter like any other electronically administered screening questionnaire. You can link these forms to individual screening questionnaires within the encounter.
Uploaded or faxed Encounter Document - Health History Questionnaire forms are located in the Visits and Cases section of the patient chart. To view a questionnaire, click Health History Questionnaire under Encounter Document(s) for an encounter.
If your practice plans to continue using paper screening questionnaires, athenahealth recommends that you enter the patient's responses from the paper form into the Screening section during the encounter. When you enter the questionnaire responses into athenaOne, you can:
- Automatically calculate the score.
- View any proposed guidelines.
- Track a patient's questionnaire results over time.
athenaOne supports the FOTO screening questionnaires, which you can use at patient discharge. Using the FOTO questionnaires, you can:
- Screen for functionality in a patient's knee, hip, foot/ankle, low back, shoulder, elbow/wrist/hand, and neck.
- Document a risk-adjusted functional status change residual score (RAFSCRS) in the Score field.
Each FOTO screening questionnaire has two versions: a 10-item short form (paper) and a computerized adaptive testing (CAT) form.
Note: Focus on Therapeutic Outcomes, Inc. (FOTO) is a third-party vendor; these screening questionnaires require the use of the FOTO proprietary patient-reported outcome measures (PROMs). See FOTO online assessments.
Before you can enter a score in a FOTO screening questionnaire in athenaOne, you must calculate a risk-adjusted functional status change residual score (RAFSCRS). The RAFSCRS is the difference between the patient's functional status score at admission and the patient's functional status score at discharge, corrected for level of severity of the patient.
To obtain a RAFSCRS or residual score, you need to complete the following steps. athenahealth recommends that you use the FOTO online assessment to complete each step, but you can also use the short paper form and a spreadsheet of risk adjustment coefficients to manually calculate each value for the steps below.
Note: See FOTO online assessments for links to the online assessments and links to the paper short forms and the coefficients spreadsheets that you can use to manually calculate RAFSCRS.
Step 1: Enter the Functional Status Score at Admission: _______
Enter the raw scores (not the risk-adjusted scores) produced when the patient completes the FOTO functional status survey at Admission; this survey generates the Patient's Functional Status Score at Admission.
Step 2: Enter the Functional Status Score at Discharge: _______
Enter the raw scores (not the risk-adjusted scores) produced when the patient completes the FOTO functional status survey at or near Discharge; this survey generates the Patient's Functional Status Score at Discharge.
Step 3: Enter the Functional Status Change Score: _______
Subtract the Admission score (Step 1) from the Discharge score (Step 2).
Step 4: Enter the Predicted (Risk-Adjusted) Functional Status Change Score: _______
This value is the amount of functional improvement (score change) that FOTO predicts for patients of a similar risk profile. This score is calculated automatically and shown as the Predicted Improvement score at the end of the online assessment.
Step 5: Enter the Risk-Adjusted Functional Status Change Residual Score: _______
Subtract the patient's raw change score (Step 3) from the predicted score (Step 4). This final score is used to select a performance quality action. Enter this final score in the Score field of the FOTO screening questionnaire in athenaOne during a discharge visit (see To complete a score-only questionnaire during an encounter).
To calculate the risk-adjusted functional status change residual score (RAFSCRS) that you enter in the FOTO screening questionnaire in athenaOne, you can use the FOTO online assessment.
Note: You can also use the short paper form and a spreadsheet of risk adjustment coefficients to manually calculate each value.
Links to the PROM computer adaptive tests
Access the CAT FOTO screening questionnaire and work through a series of questions with your patients to measure their level of function.
- #217 Computer Adaptive Knee Survey
- #218 Computer Adaptive Hip Survey
- #219 Computer Adaptive Foot and Ankle Survey
- #220 Computer Adaptive Low Back/Lumbar Spine Survey
- #221 Computer Adaptive Shoulder Survey
- #222 Computer Adaptive Elbow, Wrist and Hand Survey
- #478 Computer Adaptive Neck Impairments
Links to the PROM paper short forms and risk-adjustment coefficient spreadsheets
After you access the short-form screening questionnaire, your patient answers all the questions while the clinician or staff scores the questionnaire.
Note: To access the short-form questionnaire for the first time, you may need to register with the FOTO steward body. A measure steward is an organization that owns a measure and is responsible for maintaining the measure.
- #217 Knee FS PROM Short Form and #217 Knee Risk Adjustment Coefficients
- #218 Hip FS PROM Short Form and #218 Hip Risk Adjustment Coefficients
- #219 Foot & Ankle FS PROM Short Form and #219 Foot & Ankle Risk Adjustment Coefficients
- #220 Low Back FS PROM Short Form and #220 Low Back Risk Adjustment Coefficients
- #221 Shoulder FS PROM Short Form and #221 Shoulder Risk Adjustment Coefficients
- #222 Elbow Wrist Hand FS PROM Short Form and #222 Elbow Wrist Hand Risk Adjustment Coefficients
- #478 Neck FS PROM Short Form and #478 Neck Risk Adjustment Coefficients
You can mark the results of depression screening questionnaires as Positive or Negative to satisfy data reporting requirements and provide comprehensive clinical quality measure calculation data. The following depression screening questionnaires include the Finding field to record the Positive or Negative result.
- Beck Depression Inventory
- Beck Hopelessness Scale
- Beck Scale for Suicide Ideation
- CES-D (Center for Epidemiological Studies - Depression)
- EPDS (Edinburgh Postnatal Depression Scale)
- Geriatric Depression Scale
- Kutcher (KADS-6)
- Kutcher (KADS-11)
- PHQ-2
- PHQ-9
- PHQ-A
- PSC-17
- PSC-17 Youth
- Zung SDS (Self-Rated Depression Scale)
The Positive or Negative result appears in the encounter summary and full encounter summary, the patient chart, the Patient Care Summary, the summary of care record, and in the Screening flowsheet.
See the Available Screeners search tool to learn more about:
- Screening questionnaires available in athenaOne.
- New screening questionnaires added to athenaOne this year.
- Status of requested screening questionnaires — You can check whether a questionnaire has been requested and see if it is planned for a future release, under review, or not currently supported.